Basin Chat
Welcome to Basin Chat! This guide will help you create, customize, and embed an intelligent AI chat assistant on your website to engage visitors and generate leads.
What is Basin Chat?
Basin Chat is an AI-powered assistant that you can embed on your website to:
- Answer visitor questions about your products or services
- Guide visitors toward contact forms and lead capture
- Provide 24/7 support with intelligent, context-aware responses
- Search your website to find accurate, up-to-date information
- Customize appearance to match your brand
Basin Chat uses advanced AI to understand visitor questions and provide helpful responses based on information about your business that you provide.
Getting Started
Prerequisites
- An active Basin account with a paid subscription
- Access to add a script tag to your website
- Basic information about your business to provide context for the AI
Creating Your First Chat
- Navigate to Chats
-
Click "Chats" in the main navigation menu
-
Agree to Terms
- On your first visit, review and agree to the Basin Chat terms of service
-
Check out the Basin Chat terms of service for more information.
-
Create New Chat
- Click "New Chat" button
- Give your chat a descriptive name (e.g., "Main Website Chat" or "Product Support")
-
Select which project to add it to
-
Initial Setup
- Your chat is now created with default settings
- You'll be taken to the settings page to customize it
Understanding Chat Settings Tabs
Once you've created a chat, you can configure it using these tabs:
- General: Basic settings, allowed domains, AI context, model tier, and auto-open settings
- Appearance: Colors, avatar, preset questions, and visual customization
- Preview & Test: Test your chat with real AI responses before deploying
- Deploy: Get your embed code and manage security settings
- Conversations: View and manage chat conversations from visitors
Configuring Your Chat
General Settings
Navigate to the General tab to configure these core settings:
Chat Name
- Internal name to help you identify this chat in your dashboard
- Not visible to website visitors
Chat Title
- The title displayed in the chat header
- Example: "Hi! How can we help?" or "Customer Support"
Model Tier
- Choose from available model tiers: Cheap, Medium, or Expensive
- Each tier offers different capabilities and costs:
- Cheap: Most cost-effective, suitable for basic questions
- Medium: Balanced performance and cost
- Expensive: Most capable, best for complex interactions
- The specific AI model for each tier is configured by your administrator
- Checkout the Pricing page for more information on chat costs.
Business Context
- Provide information about your business, products, or services
- The AI uses this to answer visitor questions accurately
- Include key details like:
- What products/services you offer
- Your target customers
- Unique value propositions
- Pricing information
- Common questions and answers
Initial Message
- The greeting message visitors see when they open the chat
- Keep it friendly and inviting
- Example: "Hi there! I'm here to answer any questions about our products. How can I help you today?"
Web Search
- When enabled (recommended), the AI can search the domains in your allowed domains list for context
- Only searches the specific domains you've specified below
- Helps the AI find accurate, up-to-date information from your website
Allowed Domains
- List the websites where this chat can be embedded
- One domain per line
- Examples:
example.com,www.example.com,subdomain.example.com - This prevents unauthorized use of Basin Chat and protects your chat credits
Auto-Open Settings
Configure whether and when the chat widget automatically opens for visitors:
- Auto-open chat: Enable this to automatically open the chat widget when visitors land on your site
- Delay (seconds): Set how many seconds to wait before opening (default: 20 seconds)
- When enabled, the chat will open automatically on the visitor's first visit
- Use this to proactively engage visitors and increase interaction
Best Practices for Auto-Open:
- Set a delay of at least 10-15 seconds so visitors have time to view your page
- Use in combination with a welcoming initial message
- Consider your audience - auto-open works well for support-focused sites
- Monitor conversation metrics to see if auto-open increases engagement
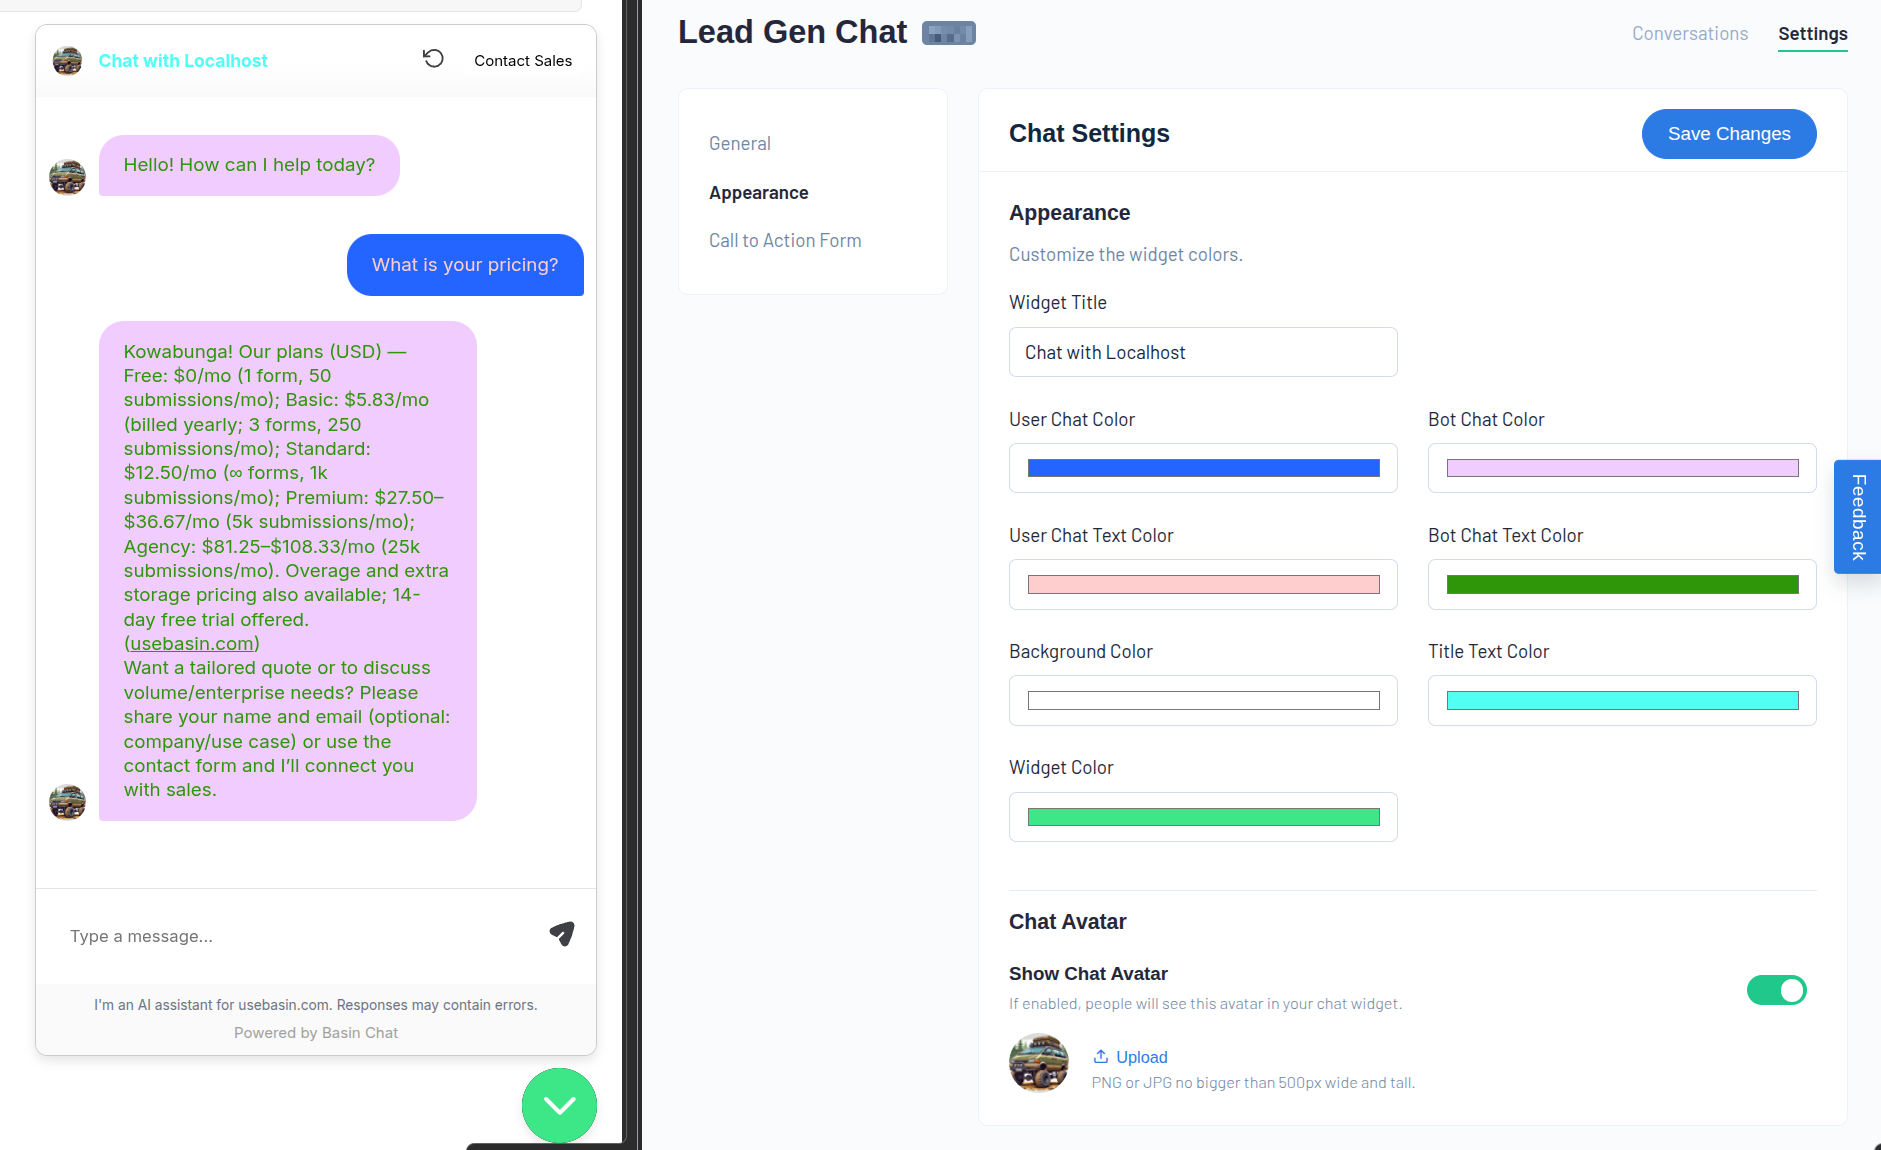
Customizing Appearance
Make Basin Chat match your brand with these customization options. Navigate to the Appearance tab in your chat settings to configure these options.
Colors
Widget Color
- Main accent color for the chat button and header
- Enter hex color code (e.g.,
#FF5733)
Background Color
- Chat window background color
- Light colors recommended for readability
Title Text Color
- Color of the chat title in the header
User Message Bubble
- Background color for visitor messages
- Text color for visitor messages
Bot Message Bubble
- Background color for AI responses
- Text color for AI responses
Avatar
Chat Avatar (Optional)
- Upload a logo or avatar image to display in bot messages
- Recommended size: 64x64 pixels
- Formats: PNG, JPG
- You can enable/disable the avatar display with the "Show Chat Avatar" toggle
Preset Questions
Add up to 3 quick-reply questions that appear above the chat input. These help guide your visitors to ask common questions:
How It Works:
- Preset questions appear as clickable buttons in the chat widget
- When a visitor clicks one, it sends that question automatically
- Great for highlighting your most important information
Examples:
- "How does pricing work?"
- "Can I see a demo?"
- "What features are included?"
- "Do you offer support?"
Best Practices:
- Keep questions short and clear (maximum 200 characters each)
- Focus on your most frequently asked questions
- Use action-oriented language
- Leave slots empty if you don't need all 3
Live Preview
- Changes you make in the Appearance tab update the preview in real-time
- You can see exactly how your chat will look before deploying
Setting Up Call-to-Action
Guide visitors to take action with a customizable call-to-action (CTA) button. The CTA appears within the chat widget to encourage conversions.
CTA Behavior Options
Choose how the CTA button should behave when clicked:
1. Form in Widget (Default)
- Links to one of your Basin Form Studio forms
- Opens the form in an overlay within the chat widget
- Keeps visitors engaged without leaving the chat
- Ideal for lead capture and contact requests
- Note: Only Form Studio forms are supported (not HTML backend forms)
2. Form in New Tab
- Links to a Basin Form Studio form
- Opens the form in a new browser tab
- Useful when you want visitors to see the full form page
- Allows visitors to continue browsing while filling out the form
3. Custom URL in New Tab
- Links to any custom URL you specify
- Opens in a new browser tab
- Perfect for:
- Linking to pricing pages
- Directing to external booking systems
- Connecting to third-party services
- Pointing to specific landing pages
- Allows full flexibility in where you direct visitors
CTA Customization
CTA Button Label
- Text displayed on the button
- Examples: "Get Started", "Contact Us", "Schedule Demo", "Request Quote", "View Pricing"
- Keep it action-oriented and clear
Button Colors
- Background color (hex code)
- Text color (hex code)
- Make sure there's sufficient contrast for readability
Best Practices:
- Choose the behavior that best matches your conversion goal
- Use clear, benefit-driven button text
- Ensure button colors stand out but match your brand
- Test different CTAs to see what resonates with your audience
Preview & Testing Your Chat
Before deploying your chat to your live website, use the Preview & Test tab to make sure everything works perfectly.
How Preview Mode Works
- Navigate to the Preview & Test tab in your chat settings
- The preview environment loads your chat widget with your current settings
- Click the chat bubble in the bottom-right to open and test
- Send messages and interact with your chat just like a real visitor would
Important Notes:
- Preview uses your current settings from the database - no CDN upload needed
- AI responses in preview mode are real and will consume chat credits
- If you make changes in the General or Appearance tabs, refresh the Preview page to see them
- Use the "Reload Preview" button to start a fresh conversation and test the initial experience
What to Test:
- Initial greeting message and preset questions
- Chat appearance and colors
- Avatar display
- AI responses to common questions
- CTA button behavior and form integration
- Auto-open functionality (if enabled)
- Mobile responsiveness
Deploying to Your Website
Once you've tested your chat and everything looks good, you're ready to deploy it to your website.
Getting Your Embed Code
- Go to the Deploy tab in your chat settings
- You'll see your embed code in a code block
- Click the "Copy" button to copy to clipboard
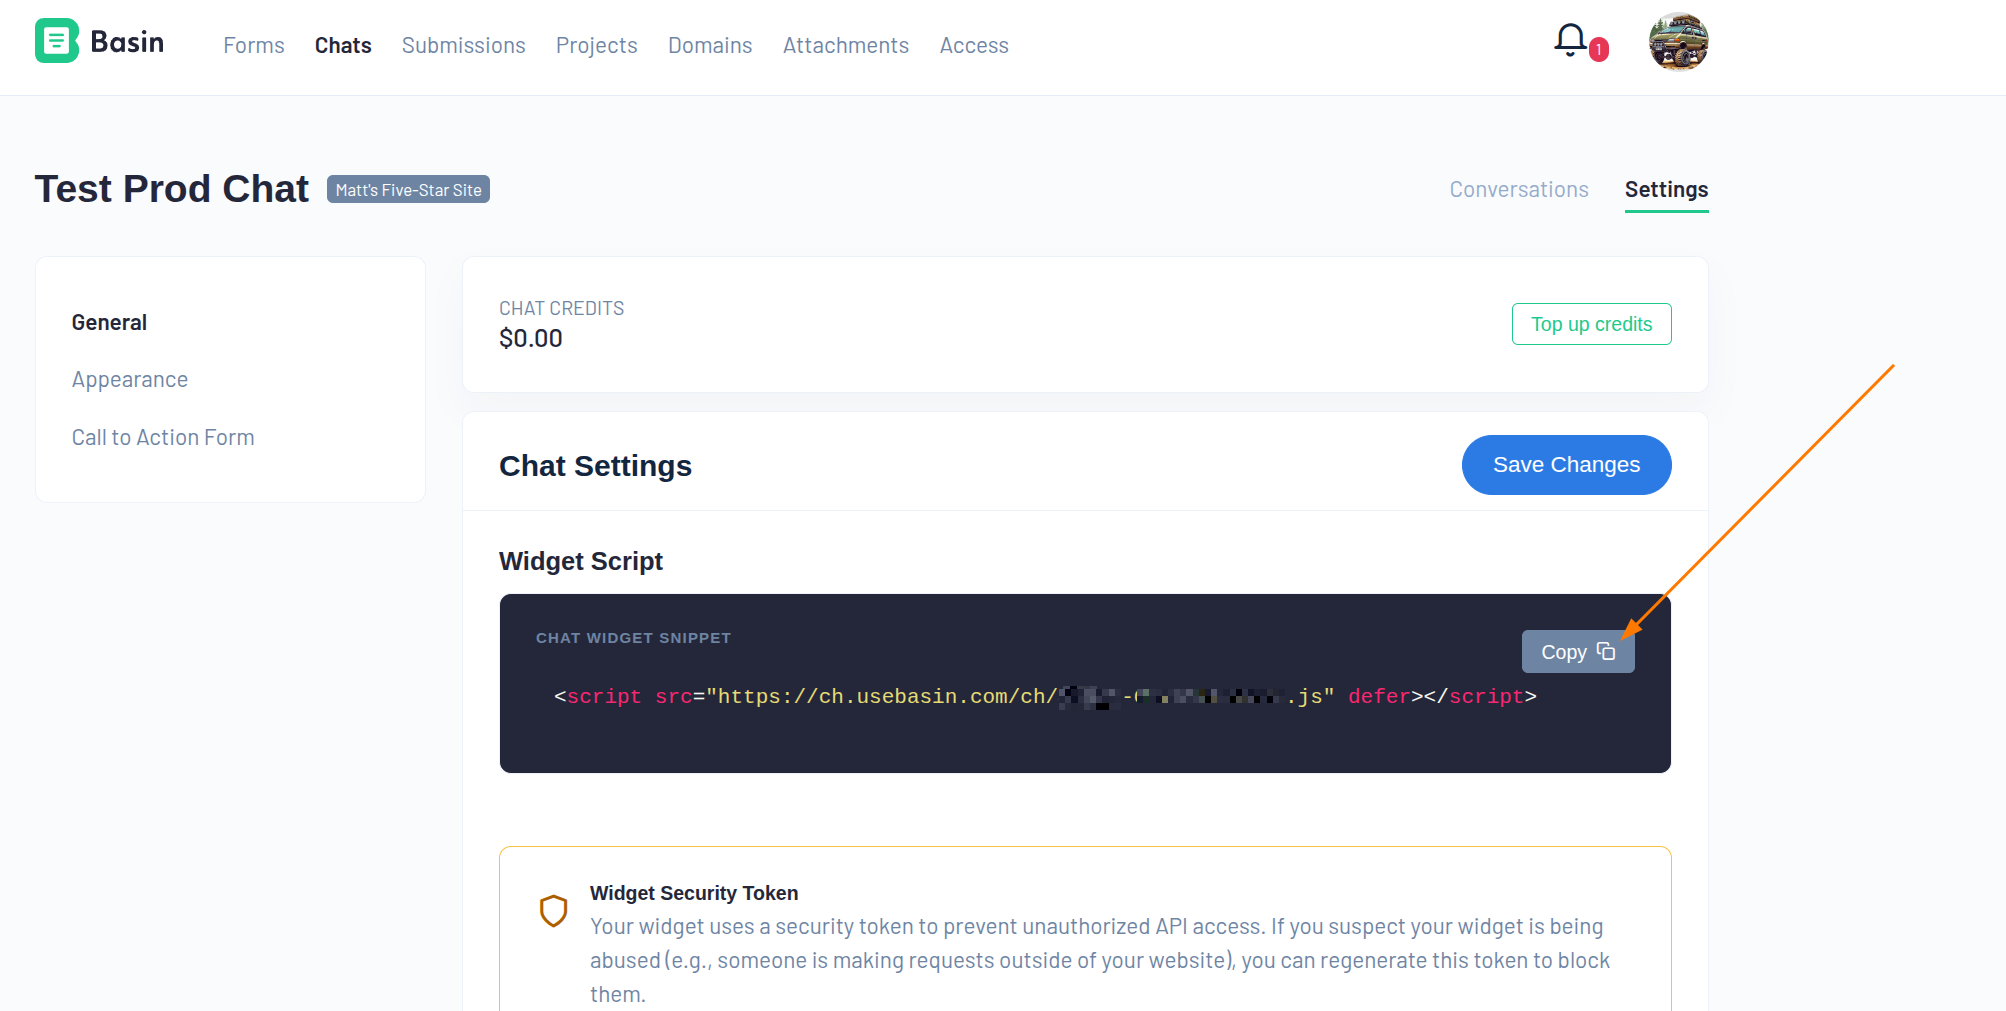
Installing Basin Chat
Add the script tag to your website's HTML, preferably before the closing </body> tag:
Platform-Specific Instructions:
- Webflow: Add to Project Settings → Custom Code → Footer Code
- WordPress: Add to your theme's footer or use a plugin like "Insert Headers and Footers"
- Shopify: Add to your theme.liquid file before
</body> - Custom HTML Sites: Add before the closing
</body>tag
Verification
After installing:
- Visit your website (use incognito mode to see the fresh visitor experience)
- Look for the chat button (typically in bottom-right corner)
- Click to open and test the chat
- Send a test message to verify it's working
- Test on both desktop and mobile devices
Updating Your Chat
When you make changes to your chat settings (colors, messages, CTA, etc.):
- The changes are automatically deployed to the CDN
- Your existing embed code remains the same - no need to update it
- Changes take effect immediately (within ~60 seconds for cache refresh)
- Visitors will see the new settings the next time they load your website
Managing Conversations
Viewing Conversations
- Go to your chat's page
- Click "Conversations" tab
- See a list of all conversations with:
- Timestamp
- Number of messages
- Preview of conversation
Conversation Details
Click any conversation to view:
- Full message history
- Visitor questions and AI responses
- Timestamp for each message
- Any external resources referenced
Conversation Management
- Conversations are automatically retained for 365 days
- No action needed on your part
- Older conversations are automatically deleted
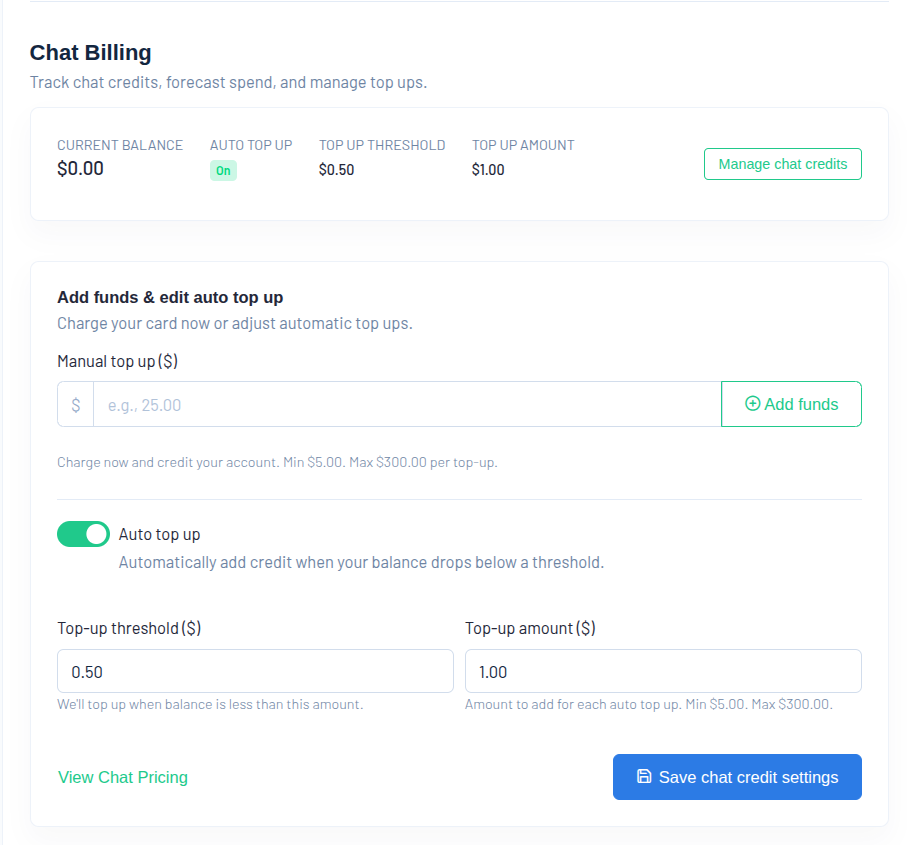
Understanding Billing & Credits
How Credits Work
- Basin Chat usage is charged per conversation
- Costs are based on AI usage (tokens processed)
- Credits are measured in cents ($0.01 = 1 credit = 1 cent)
- You'll receive $1.00 in free credits to start
Viewing Your Balance
Navigate to Account Settings → Billing:
- Current credit balance
- Usage over time (chart)
- Average daily spend
- Estimated days remaining at current usage
Pricing
Costs vary by:
- AI Model Selected - Some models are more expensive but more capable
- Conversation Length - Longer conversations cost more
- Web Search Usage - Searching your website adds minimal cost
Use the cost estimator in your billing settings to get an estimate of conversation costs based on your selected AI model and typical usage patterns.
Adding Credits
Payment Method Required
You must have a default payment method on file to add chat credits. Add a payment method in Account Settings → Billing before purchasing credits.
Manual Top-Up
- Go to Account Settings → Billing
- Choose an amount ($5, $10, $25, or $50)
- Complete payment via Stripe
- Credits added immediately
Auto Top-Up (Recommended)
- Enable auto top-up in billing settings
- Set threshold (when to trigger, e.g., $5.00)
- Set top-up amount (how much to add, e.g., $20.00)
- When balance drops below threshold, credits are automatically added
- You'll receive email confirmation
Low Balance Notifications
You'll receive email notifications when:
- Balance drops below $20, $10, $5, $1
- Balance reaches $0 (depleted)
- Ensures you never unexpectedly run out of credits
Security & Domain Settings
Domain Restrictions
Purpose: Prevent unauthorized use of Basin Chat
How to Configure:
- In chat settings, find "Allowed Domains"
- Add each domain where you want to use Basin Chat
- One domain per line
- Examples:
example.comwww.example.comsubdomain.example.com
Important Notes:
- Only listed domains can use Basin Chat
- Requests from other domains are automatically blocked
- Update this list when moving to new domains
Security Token
What It Is: A unique security key embedded in Basin Chat to prevent unauthorized abuse.
When to Regenerate:
- If you suspect your widget is being abused
- If someone is making requests from outside your allowed domains
- If your embed code has been copied to spam sites
- As a precautionary security measure
How to Regenerate:
- Go to the Deploy tab in your chat settings
- Scroll to the "Widget Security Token" section
- Choose your regeneration mode:
Standard Regeneration (Default):
- New visitors must refresh their browser to start chatting
- Visitors already in an active conversation can continue using it
- Minimal disruption to legitimate users
- Recommended for most situations
Terminate All Active Conversations (Nuclear Option):
- Check the "Also terminate all active conversations" box
- Immediately disconnects ALL visitors currently chatting
- Everyone must refresh to reconnect
- Use only when you need to stop abuse right now
-
This is the most disruptive option but provides immediate protection
-
Click "Regenerate Security Token"
After Regeneration:
- The new token is automatically distributed via the CDN
- No need to update your embed code on your website
- Changes take effect immediately
- New visitors will automatically use the new token
- Legitimate users on your allowed domains can simply refresh to reconnect
Important Notes:
- Regenerating the token does not change your embed code - the script URL stays the same
- Your allowed domains list is still enforced with the new token
- Use this feature sparingly to avoid disrupting legitimate users
Troubleshooting
Basin Chat Not Appearing
Check 1: Test in Preview Mode First
- Go to the Preview & Test tab in your chat settings
- If the chat works there but not on your website, the issue is with your embed code installation
- If it doesn't work in preview mode, there may be a configuration issue
Check 2: Embed Code Installation
- Verify the script tag is present on your website
- Check browser console for errors (F12 → Console)
- Ensure the script URL matches your chat's embed code from the Deploy tab
- Make sure the script tag includes the
deferattribute
Check 3: Domain Settings
- Add your domain to "Allowed Domains" in the General settings
- Include the correct subdomain (www vs non-www)
- Save changes and wait up to 60 seconds for CDN cache to refresh
Check 4: Browser Issues
- Clear browser cache and hard refresh (Ctrl+F5 or Cmd+Shift+R)
- Try in incognito/private mode
- Test in a different browser
Messages Not Sending
Check 1: Credit Balance
- Verify you have sufficient credits
- Add credits if balance is $0
- Enable auto top-up to prevent future issues
Check 2: Network Connection
- Check your internet connection
- Look for firewall/security software blocking requests
Check 3: Error Messages
- Read any error messages displayed in the chat
- Common errors and solutions:
- "Insufficient credits" → Add credits
- "Rate limit exceeded" → Wait a minute and try again
- "Connection lost" → Refresh the page
AI Giving Incorrect Answers
Solution 1: Update Business Context
- Review and update your business context in settings
- Add more specific information about your offerings
- Include common questions and preferred answers
Solution 2: Check Allowed Domains for Web Search
- Ensure your website domain is in allowed domains list
- This allows the AI to search your site for answers
Solution 3: Verify Web Search is Enabled
- Check that "Web Search" is enabled in settings
- This helps AI find current information
"Invalid Widget Token" Error
Cause: Security token has been regenerated
Solution:
- Go to chat settings
- Copy the current embed code
- Update the script tag on your website
- Ask visitors to refresh their browser
"Origin Not Allowed" Error
Cause: Domain not in allowed domains list
Solution:
- Check which domain is showing the error
- Add that exact domain to "Allowed Domains"
- Include protocol if needed (http:// or https://)
- Save changes
Best Practices
Writing Effective Business Context
Do:
- Be specific about what you offer
- Include pricing or pricing ranges
- Mention your target customers
- List key features and benefits
- Anticipate common questions
- Use clear, simple language
Don't:
- Use jargon without explanation
- Include irrelevant information
- Make it too long (focus on essentials)
- Forget to update when offerings change
Optimizing Chat Performance
- Use Preview & Test Regularly
- Test changes in the Preview tab before they go live
- Verify AI responses are accurate and helpful
- Test preset questions to ensure they work as expected
-
Check that auto-open timing feels natural
-
Keep Context Current
- Review and update business context monthly
- Add new products/services immediately
-
Remove outdated information
-
Monitor Conversations
- Review conversations weekly
- Identify common questions
- Add frequently asked questions as preset questions
-
Update business context based on visitor questions
-
Test Different Configurations
- Try different preset questions to see what visitors engage with
- Experiment with auto-open timing (or disable if it feels too aggressive)
- Test different CTA behaviors to maximize conversions
-
Use the Preview tab to test changes before deploying
-
Set Appropriate CTA
- Make CTA label clear and action-oriented
- Choose the right CTA behavior for your goal
- Test CTA flow end-to-end in Preview mode
Managing Costs
- Start with Default Model
- The default model balances cost and quality
-
Upgrade only if you need advanced capabilities
-
Monitor Usage
- Check billing dashboard weekly
- Set up auto top-up to avoid service interruption
-
Review high-cost conversations to understand usage
-
Optimize Context Length
- Include essential information
- Remove redundancy
- Keep context focused and relevant
Brand Consistency
- Match Your Website Design
- Use your brand colors
- Upload your logo as avatar
-
Keep tone consistent with your brand voice
-
Professional Initial Message
- Friendly but professional
- Set clear expectations
-
Encourage engagement
-
Thoughtful CTA Button
- Clear value proposition
- Action-oriented language
- Matches your conversion goals
Need Help?
If you're still experiencing issues:
- Check Your Credit Balance - Most issues are credit-related
- Review This Guide - Solutions to common problems are documented above
- Contact Basin Support - We're here to help!
- Email: support@usebasin.com
- Include your chat name and description of the issue
Additional Resources
- Basin Dashboard: Manage all your chats and conversations
- Billing Settings: Monitor usage and manage credits
- Account Settings: API keys and integration options
Related Features
- Form Studio - Create forms to use with Basin Chat's CTA feature
- Lead Agent - Score and prioritize leads from form submissions
- Plan Comparison - Compare Basin plans and chat credit pricing