Webhooks
Use Basin to repost submission data to other apps and services.
Configuring a webhook
If you only need to forward submission data to a single app or service, then a custom webhook is a great solution. Basin supports the following types of payloads for custom webhooks:
- JSON
- Data wrapped JSON
- Form URL encoded
- Customer.IO
- Microsoft Teams
- MailerLite
- Pardot Form Handler
- Custom Webhook Template
To setup a custom webhook in Basin, go to the Integrations page in your form dashboard, enter your desired URL in the input field, save, and you're all set!
When a submission is received by an endpoint with a configured webhook URL, Basin will queue up a post on your behalf. If the webhook fails, we will retry up to 15 times over the course of 24-28 hours with an exponential backoff. The format of our webhooks will be exactly what we receive on the inital form submission.
Webhook Triggering
Only submissions that are not flagged as spam will trigger a webhook by default. There is a checkbox to enable webhooks for all submsissions. This is an excellent strategy for bypassing any spam filtering by Basin.
Re-firing webhooks
If a webhook fails or you need to resend submission data, Basin lets you re-fire webhooks manually without resubmitting the form.
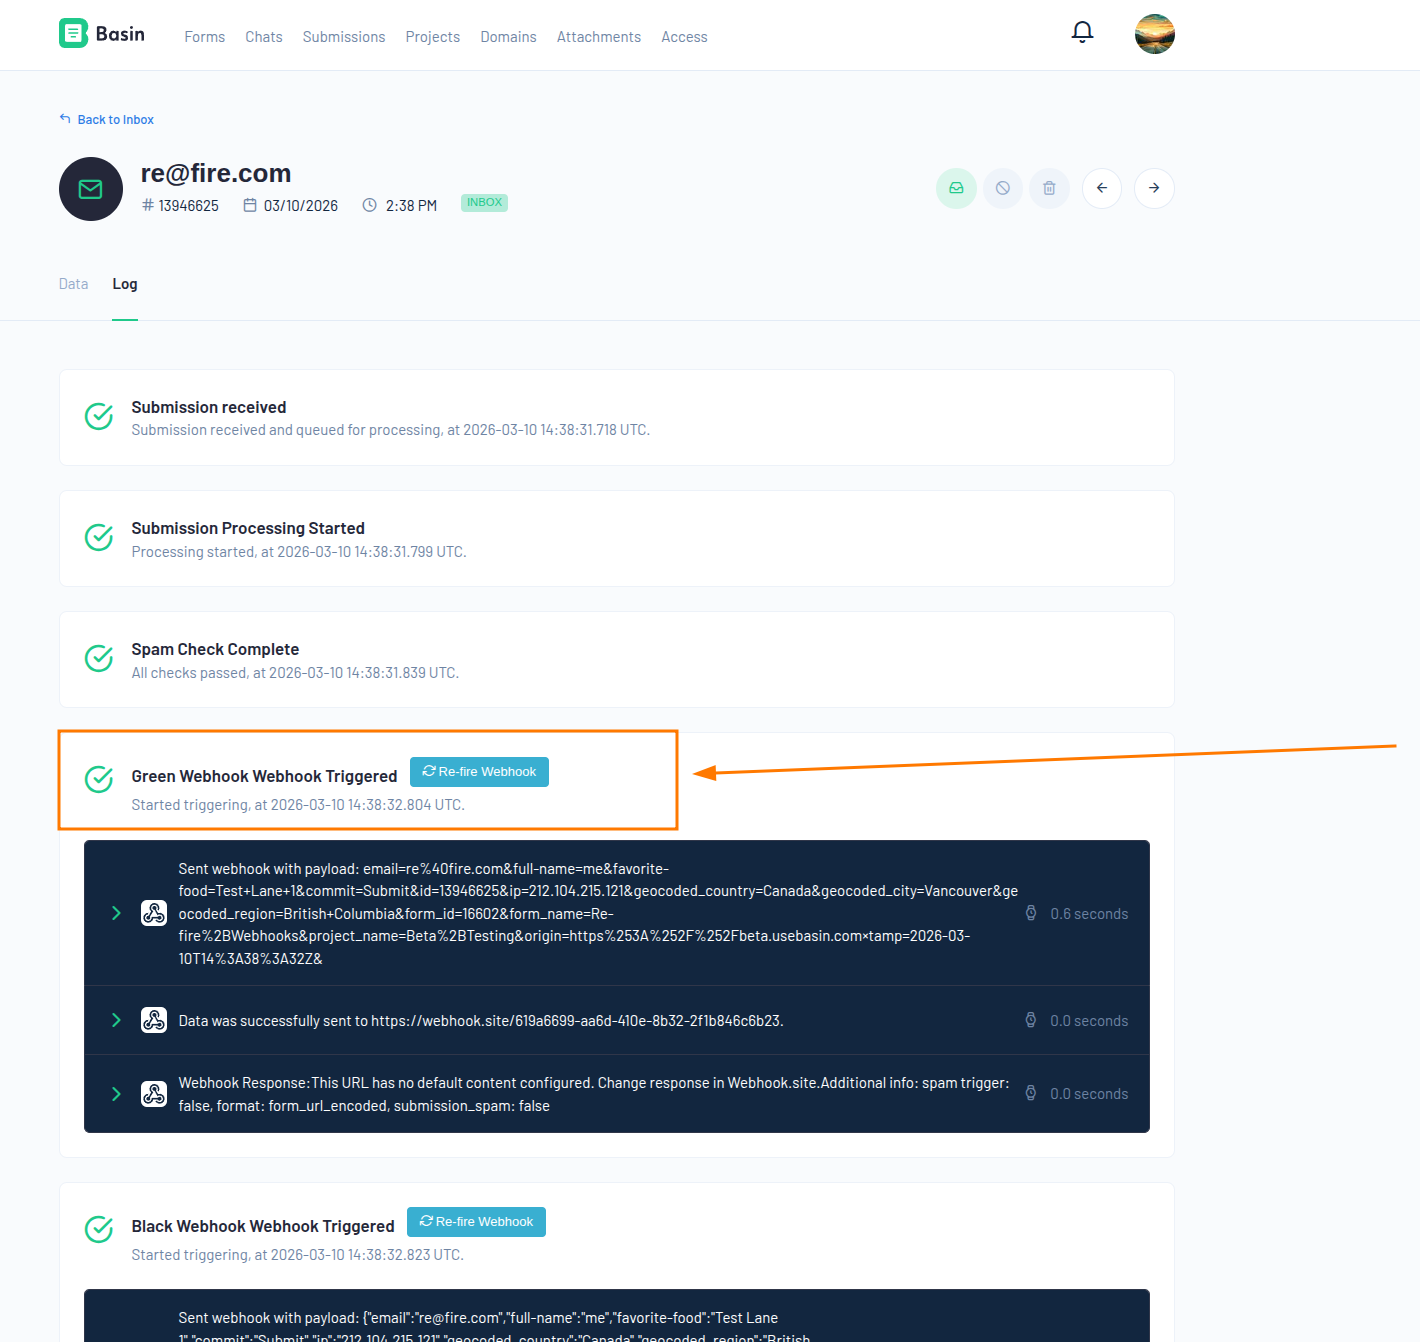
From the submission log
Each submission has a Log view showing a full history of webhook attempts. Click the Re-fire Webhook button next to any webhook event to immediately re-queue that specific webhook. A new log entry will be created for the re-fire attempt.
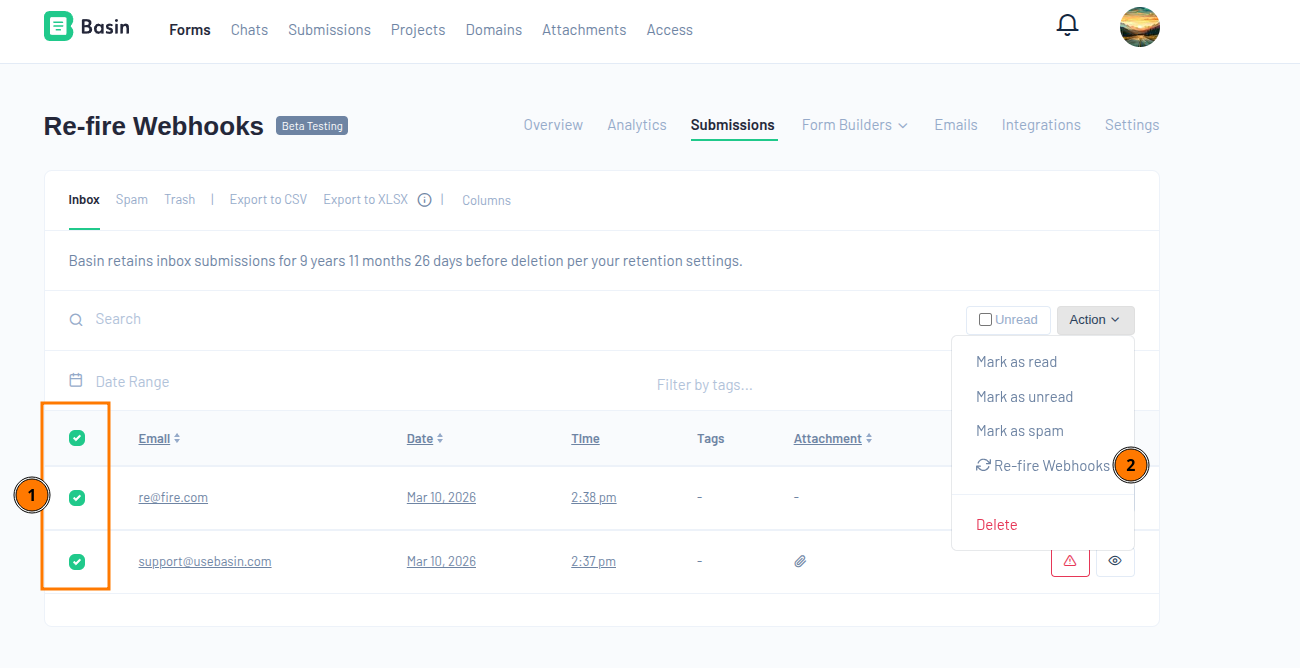
Bulk re-fire from the submissions inbox
To re-fire webhooks for multiple submissions at once:
- Open your form's Submissions page.
- Select the submissions using the checkboxes.
- Open the Action dropdown and choose Re-fire Webhooks.
This will queue webhooks for all enabled webhooks on each selected submission.
Via the API
You can also trigger webhook re-fires programmatically using the Basin API.
Single submission:
Multiple submissions:
curl -X POST "https://usebasin.com/api/v1/submissions/refire_webhooks?api_token=YOUR_TOKEN" \
  -H "Content-Type: application/json" \
  -d '{"submission_ids": [123, 456]}'
Both endpoints accept an Account API key or a Form API key. When a Form API key is used, only submissions belonging to that specific form can be re-fired.
See the API Reference for full details.
Payload Types
JSON
{
  "email": "example@example.com",
  "name": "Example Name",
  "id": "submission_id",
  "attachments": [
    {
      "attachment_proxy_url": "proxy_url",
      "public_url": "public_url"
    }
  ]
}
Data wrapped JSON
{
  "data": {
    "email": "example@example.com",
    "name": "Example Name",
    "id": "submission_id",
    "attachments": [
      {
        "attachment_proxy_url": "proxy_url",
        "public_url": "public_url"
      }
    ]
  }
}
Customer.IO
{
  "data": {
    "email": "example@example.com",
    "name": "Example Name",
    "submission_id": "submission_id"
  }
}
Form URL encoded/Pardot Form Handler
For Form URL encoded and the Pardot Form Handler, the form data is sent as is without any additional processing. Here is an example:
The only difference between the Form URL encoded and the Pardot Form Handler is when the submission has array values. Pardot Form Handlers do not support array values and require duplicate keys for each array value. The Pardot Form Handler payload type will properly send array values using multiple duplicate keys.MailerLite integration
The MailerLite payload type will send the submission data to MailerLite as follows:
Customer.IO integration
To integrate your form with Customer.io using webhooks, follow these steps:
- Open your Basin dashboard and navigate to the form you wish to integrate with Customer.io.
- Go to 'Integrations' and then 'Webhooks'.
- Click on 'Create a new webhook'.
- In the 'Webhook URL' field, enter the webhook URL provided by Customer.io for your form.
- In the 'Payload Format' field, select "Customer IO."
- Provide the necessary authentication headers. Use "Authorization" as the Header Name and "Basic YOUR_CUSTOMER_IO_API_KEY" as the Header Value, replacing YOUR_CUSTOMER_IO_API_KEY with your actual Customer.io API key.
With these steps, your form is now integrated with Customer.io and will send data via webhooks.
Microsoft Teams Integration
Seamlessly send submission data to your Microsoft Teams channels with our Basin-Teams integration. Head to our Microsoft Teams integration guide to get started.
Pardot Form Handler Integration
To integrate your form with Pardot using webhooks, follow these steps:
- Open your Basin dashboard and navigate to the form you wish to integrate with Pardot.
- Go to 'Integrations' and then 'Webhooks'.
- Click on 'Create a new webhook'.
- In the 'Webhook URL' field, enter the webhook URL provided by your Pardot form handler.
- In the 'Payload Format' field, select "Pardot."
- Provide any necessary authentication headers.
With these steps, your form is now integrated with Pardot and will send data via webhooks.
Custom Webhook Template
If our pre-built payloads do not meet your requirements, you can create a custom webhook using our flexible template builder. This allows seamless integration with any API, providing you with the ultimate customization and control over your form submissions.
Setup a custom webhook template
- Open your Basin dashboard and navigate to the form you wish to integrate with a custom webhook body.
- Go to 'Integrations' and then 'Webhooks'.
- Click on 'Create a new webhook'.
- In the 'Webhook URL' field, enter the webhook URL you wish to send the payload to.
- In the 'Payload Format' field, select "Custom."
- Provide any necessary authentication headers.
- Save the webhook.
- Edit the webhook body by following the link to 'Edit Custom Format'
Webhook templates support merge tags, placeholders for submission data that are dynamically replaced with the submission data when the webhook is sent. To learn more about merge tags, check out our docs here.
Custom Webhook Content Types
Basin supports several different content types for sending webhook data:
- application/json
- application/xml
- application/x-www-form-urlencoded
- multipart/form-data
- text/plain
- application/graphql
n8n Integration Example
Here's a complete example of setting up a custom webhook body for n8n integration using the application/json content type.
Standard JSON vs Custom Template
For basic n8n integrations, you can simply use the standard "JSON" payload format from the dropdown, which will send all form data in a clean JSON structure. Use the custom template below when you need additional data like source tracking, lead scoring, or custom formatting for your n8n workflow.
Setup Steps
- Open your Basin dashboard and navigate to the form you wish to integrate with n8n.
- Go to 'Integrations' and then 'Webhooks'.
- Click on 'Create a new webhook'.
- In the 'Webhook URL' field, enter your n8n webhook URL.
- In the 'Payload Format' field, select "Custom."
- Set the content type to "application/json".
- Save the webhook.
- Edit the webhook body by following the link to 'Edit Custom Format'
Example Custom Template for n8n
Use this sample template in the custom webhook body editor:
{
  "form-name": "{{form_name}}",
  {{#each form_params}}
    "{{this.name}}": "{{JSONstringify this.value}}",
  {{/each}}
  {{#if source_url}}
    "source_host": "{{source_host}}",
    "source_path": "{{source_path}}",
    "source_query": {
      {{#if source_query}}
        {{#each source_query}}
          "{{this.name}}": "{{this.value}}"{{#unless @last}},{{/unless}}
        {{/each}}
      {{/if}}
    },
    "source_fragment": "{{source_fragment}}",
  {{/if}}
  {{#if lead_agent.score}}
    "lead_agent": {
      "score": "{{lead_agent.score}}",
      "score_reasoning": "{{lead_agent.score_reasoning}}",
      "score_location_info": "{{lead_agent.score_location_info}}"
    },
  {{/if}}
  "attachments": [
    {{#each attachment}}
      {
        "name": "{{this.name}}",
        "public_url": "{{this.public_url}}",
        "file_size": "{{this.file_size}}"
      }{{#unless @last}},{{/unless}}
    {{/each}}
  ]
}
Using JSONstringify Helper
The JSONstringify helper in the form_params loop ensures that form field values are properly escaped for JSON. This is especially important when form data contains special characters, quotes, or line breaks that could break the JSON structure. Without this helper, a form submission with a value like He said "Hello" could create invalid JSON.
This template provides a comprehensive payload that includes:
- Form identification: The name of the form that submitted the data
- Form data: All form field values with proper JSON escaping
- Source tracking: Information about where the form was submitted from (URL, host, path, query parameters, and fragment)
- Lead scoring: If enabled, includes lead agent scoring data and reasoning
- File attachments: Details about any uploaded files including names, URLs, and file sizes
Webhook Signing
Every Basin webhook includes a cryptographic signature so you can verify that incoming requests are genuinely from Basin and have not been tampered with.
How it works
When Basin sends a webhook request, it includes an X-Basin-Signature header containing an HMAC-SHA256 signature of the raw request body:
The signature is computed using a unique signing secret that is automatically generated for each webhook when it is created.
Finding your signing secret
- Go to Integrations → Webhooks in your form dashboard.
- Click Edit on the webhook you want to inspect.
- Scroll to the Webhook Signing section.
- Click Show to reveal the signing secret.
Keep your signing secret private
Treat the signing secret like a password. Anyone with access to it can forge webhook signatures. Never expose it in client-side code or version control.
Regenerating the signing secret
If your signing secret is ever compromised, click Regenerate Secret in the Webhook Signing section. Basin will immediately start signing all future requests with the new secret. Update your endpoint to use the new secret before regenerating to avoid dropped events.
Verifying signatures on your endpoint
To verify a webhook request, compute HMAC-SHA256 of the raw request body using your signing secret and compare it to the value in the X-Basin-Signature header.
=== "Ruby"
```ruby
require 'openssl'

def valid_signature?(payload_body, signature_header, secret)
  expected = "sha256=#{OpenSSL::HMAC.hexdigest('SHA256', secret, payload_body)}"
  ActiveSupport::SecurityUtils.secure_compare(expected, signature_header)
end
```
=== "Node.js"
```javascript
const crypto = require('crypto');

function validSignature(payloadBody, signatureHeader, secret) {
  const expected = 'sha256=' + crypto
    .createHmac('sha256', secret)
    .update(payloadBody)
    .digest('hex');
  return crypto.timingSafeEqual(
    Buffer.from(expected),
    Buffer.from(signatureHeader)
  );
}
```
=== "Python"
```python
import hmac
import hashlib

def valid_signature(payload_body: bytes, signature_header: str, secret: str) -> bool:
    expected = 'sha256=' + hmac.new(
        secret.encode(), payload_body, hashlib.sha256
    ).hexdigest()
    return hmac.compare_digest(expected, signature_header)
```
=== "PHP"
```php
function validSignature(string $payloadBody, string $signatureHeader, string $secret): bool {
    $expected = 'sha256=' . hash_hmac('sha256', $payloadBody, $secret);
    return hash_equals($expected, $signatureHeader);
}
```
Use the raw request body
Always compute the signature against the raw, unmodified request body bytes. Parsing the body into JSON and re-serializing it will produce a different signature.
Use a constant-time comparison
Use a timing-safe string comparison (e.g. hash_equals, hmac.compare_digest, crypto.timingSafeEqual) to prevent timing attacks.
Related Features
- Microsoft Teams - Send submissions directly to Teams channels using the Teams webhook format
- Slack - Post submissions to Slack channels via webhooks or Zapier
- Zapier - Connect Basin to 1,400+ apps for webhook-based automation
- Make - Build visual automation workflows with webhook triggers
- Submission Tags and Rules - Trigger webhooks based on specific tag conditions
- Standard Information - Automatic webhook configuration for lead distribution
- API Reference - Programmatic access to submission data